この記事は個人ブログと同じ内容です
www.ritolab.com
AWS の API Gateway(HTTP API) + Lambda + DynamoDB を使ってサーバレスアーキテクチャを構築してみます。
開発環境
- Terraform v1.0.2
DynamoDB テーブルを作成
データベースを用意します。DynamoDB にテーブルを作成します。
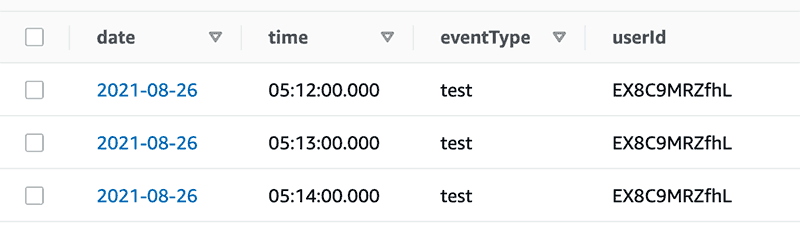
構成としては、date(年月日)をパーティションキーにして、ソートキーに time(時分秒)を起きたいと思います。
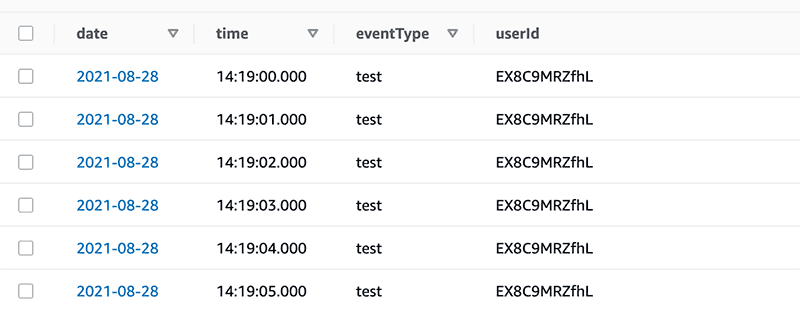
先に見せるとこんな感じのテーブルを作ります
main.tf
resource "aws_dynamodb_table" "event_log_table" {
  name           = "EventLog"
  billing_mode   = "PROVISIONED"
  read_capacity  = 1
  write_capacity = 1
  hash_key       = "date"
  range_key      = "time"

  attribute {
    name = "date"
    type = "S"
  }

  attribute {
    name = "time"
    type = "S"
  }
}
DynamoDB のテーブル作成自体は簡単で、ミニマムは上記のように数行書けば作成できます。

Lambda function 作成
次に DynamoDB に情報を記録していく Lambda function を作成します。
CloudWatch Log Group と Role の作成
関数に行く前に Lambda function 実行のログを CloudWatchLogs に流すためにロググループと、そこへの書き込み、および DynamoDB にアクセスできる Lambda 用のロールを作成しておきます。
main.tf
# CloudWatch ロググループ作成
## https://registry.terraform.io/providers/hashicorp/aws/latest/docs/resources/cloudwatch_log_group
resource "aws_cloudwatch_log_group" "log_events_lambda_function" {
  name = "/aws/lambda/${var.log_events_lambda_function_name}"
}

# Iam Role 作成
## https://registry.terraform.io/providers/hashicorp/aws/latest/docs/resources/iam_role
resource "aws_iam_role" "lambda_function" {
  name = "${var.app_name}-log-events-lambda-function-role"

  assume_role_policy = jsonencode({
    Version : "2012-10-17",
    Statement = [
      {
        Effect = "Allow",
        Principal = {
          Service = "lambda.amazonaws.com"
        },
        Action = "sts:AssumeRole"
      }
    ]
  })
}

# Iam Policy 作成
## https://registry.terraform.io/providers/hashicorp/aws/latest/docs/resources/iam_role_policy
resource "aws_iam_policy" "lambda_function_put_log_events" {
  name        = "log-events-lambda-function-policy"
  description = "IAM policy for log events Lambda function."

  policy = jsonencode({
    Version : "2012-10-17",
    Statement = [
      {
        Action   = "logs:CreateLogGroup",
        Effect   = "Allow",
        Resource = "arn:aws:logs:${var.aws_region}:${var.aws_id}:*"
      },
      {
        Action = [
          "logs:CreateLogStream",
          "logs:PutLogEvents",
        ],
        Effect = "Allow",
        Resource = [
          "${aws_cloudwatch_log_group.log_events_lambda_function.arn}:*"
        ]
      },
      // AWS Lambda: Lambda 関数に Amazon DynamoDB テーブルへのアクセスを許可します
      // https://docs.aws.amazon.com/ja_jp/IAM/latest/UserGuide/reference_policies_examples_lambda-access-dynamodb.html
      {
        Action = [
          "dynamodb:Scan",
          "dynamodb:GetItem",
          "dynamodb:PutItem",
        ]
        Effect   = "Allow"
        Resource = aws_dynamodb_table.event_log_table.arn
      },
    ]
  })
}

# Policy を Role にアタッチ
## https://registry.terraform.io/providers/hashicorp/aws/latest/docs/resources/iam_role_policy_attachment
resource "aws_iam_role_policy_attachment" "lambda_function_put_log_events" {
  policy_arn = aws_iam_policy.lambda_function_put_log_events.arn
  role       = aws_iam_role.lambda_function.name
}
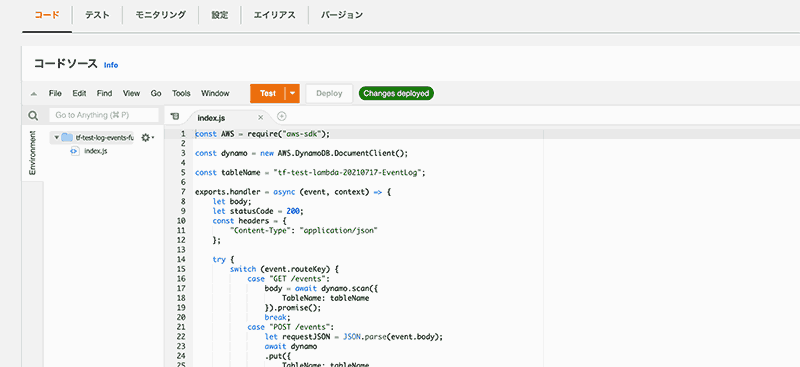
Lambda function 作成
function は node.js で、ソースコードは terraform 管理です。
index.js
const AWS = require("aws-sdk");

const dynamo = new AWS.DynamoDB.DocumentClient();

const tableName = "EventLog";

exports.handler = async (event, context) => {
    let body;
    let statusCode = 200;
    const headers = {
        "Content-Type": "application/json"
    };

    try {
        switch (event.routeKey) {
            case "GET /events":
                body = await dynamo.scan({
                    TableName: tableName
                }).promise();
                break;
            case "POST /events":
                let requestJSON = JSON.parse(event.body);
                await dynamo
                .put({
                    TableName: tableName,
                    Item: {
                        date: requestJSON.date,
                        time: requestJSON.time,
                        userId: requestJSON.userId,
                        eventType: requestJSON.eventType
                    }
                })
                .promise();
                body = `Put item ${requestJSON.userId}`;
                break;
            default:
                throw new Error(`Unsupported route: "${event.routeKey}"`);
        }
    } catch (err) {
        statusCode = 400;
        body = err.message;
    } finally {
        body = JSON.stringify(body);
    }

    return {
        statusCode,
        body,
        headers
    };
};
Lambda 関数自体は API Gateway のチュートリアルを参考にしています。
docs.aws.amazon.com
main.tf
# ファイルの ZIP 化
## https://registry.terraform.io/providers/hashicorp/archive/latest/docs/data-sources/archive_file
data "archive_file" "log_events_lambda_function" {
  type        = "zip"
  source_dir  = "path/to/functions/${var.log_events_lambda_function_name}"
  output_path = "path/to/functions/upload/${var.log_events_lambda_function_name}.zip"
}

# Lambda function 作成
## https://registry.terraform.io/providers/hashicorp/aws/latest/docs/resources/lambda_function
resource "aws_lambda_function" "log_events" {
  filename      = data.archive_file.log_events_lambda_function.output_path
  function_name = var.log_events_lambda_function_name
  role          = aws_iam_role.lambda_function.arn
  handler = "index.handler"

  source_code_hash = filebase64sha256(data.archive_file.lambda_function.output_path)

  runtime = "nodejs14.x"

  depends_on = [
    aws_iam_role_policy_attachment.lambda_function_put_log_events,
    aws_cloudwatch_log_group.log_events_lambda_function
  ]
}
- Lambda function を適用させる際に ZIP で上げるため、作成した js ファイルを ZIP 化しています。
- source_code_hash で ZIP ファイルをハッシュ化しています(filebase64sha256() 関数は Terraform 0.11.12 以降。それ以前は base64sha256() と file() 関数を使う)
- apply や plan 時に ZIP ファイルが作成される
- role でに先程作成した IAM Role を指定しています。
apply すると Lambda 関数が作成されます
ここからは Amazon API Gateway を使って先程作成した lambda function を利用する際のエンドポイントを作成していきます。
今回は HTTP API で作成します。作成に必要なステップは以下になります。
- API 作成
- 統合設定
- ルート設定
- ステージ設定
まずは大本になる API を作成します。
main.tf
# API 作成
## https://registry.terraform.io/providers/hashicorp/aws/latest/docs/resources/apigatewayv2_api
resource "aws_apigatewayv2_api" "log_events" {
  name          = "xxxxxxxxxxxx"
  protocol_type = "HTTP"

  cors_configuration {
    allow_origins = ["*"]
    allow_methods = ["GET", "POST"]
    allow_headers = ["*"]
  }
}
cors_configuration - CORS の設定を行っています。設定できる項目は以下(すべて optional)
- allow_origins
- allow_headers
- allow_methods
- allow_credentials
- expose_headers
- max_age
HTTP API の CORS の設定
docs.aws.amazon.com
統合設定(API と Lambda function の関連付け)
先程作成した API と Lambda function を紐付けます。
main.tf
# 統合設定(API と Lambda function の紐付け)
## https://registry.terraform.io/providers/hashicorp/aws/latest/docs/resources/apigatewayv2_integration
resource "aws_apigatewayv2_integration" "log_events" {
  api_id           = aws_apigatewayv2_api.log_events.id
  integration_type = "AWS_PROXY"
  integration_method = "POST"
  integration_uri = aws_lambda_function.log_events.invoke_arn
  payload_format_version = "2.0"
}
integration_type - 統合タイプを選択。HTTP API の場合は websocket もサポートしているので選択肢がいくつかあり、Lambda function と統合させる場合は AWS_PROXY を設定する。
選択できる項目
- AWS(WebSocket API でのみサポート)
- AWS_PROXY
- HTTP(WebSocket API でのみサポート)
- HTTP_PROXY
- MOCK(WebSocket API でのみサポート)
docs.aws.amazon.com
integration_method - 統合先へのリクエストの HTTP method を指定。Integration_type が MOCK でない場合は指定は必須。Lambda との統合なので POST を指定。
docs.aws.amazon.com
ルート設定
作成した API に対してメソッドやリソースを設定します。
docs.aws.amazon.com
main.tf
# ルート設定
## https://registry.terraform.io/providers/hashicorp/aws/latest/docs/resources/apigatewayv2_route
variable "routeList" {
  type    = list(string)
  default = ["GET /events", "POST /events"]
}
resource "aws_apigatewayv2_route" "log_events" {
  count  = length(var.routeList)

  api_id = aws_apigatewayv2_api.log_events.id
  route_key = element(var.routeList, count.index)

  target = "integrations/${aws_apigatewayv2_integration.log_events.id}"
}
target - アタッチする統合を指定する
- Integrations/{IntegrationID} の形式で指定
- IntegrationID は aws_apigatewayv2_integration リソースの識別子
route_key - "GET /events" のように「<HTTP メソッド> <リソースパス>」で指定 (今回は 2 メソッド分まとめた記述になっている)
ステージ設定
ステージを設定します。
docs.aws.amazon.com
リクエストのログも残したいので CloudWatch のロググループも併せて作成して設定します。
main.tf
resource "aws_cloudwatch_log_group" "log_events_http_api" {
  name = "/aws/apigateway/${var.log_events_api_name}"
}

# ステージ設定
## https://registry.terraform.io/providers/hashicorp/aws/latest/docs/resources/apigatewayv2_stage
resource "aws_apigatewayv2_stage" "log_events" {
  api_id      = aws_apigatewayv2_api.log_events.id
  name        = "$default"
  auto_deploy = true

  access_log_settings {
    destination_arn = aws_cloudwatch_log_group.log_events_http_api.arn

    format = jsonencode({
      requestId : "$context.requestId",
      ip : "$context.identity.sourceIp",
      requestTime : "$context.requestTime",
      httpMethod : "$context.httpMethod",
      routeKey : "$context.routeKey",
      status : "$context.status",
      protocol : "$context.protocol",
      responseLength : "$context.responseLength",
      errorMessage : "$context.error.message",
      errorResponseType : "$context.error.responseType"
      authorizerError : "$context.authorizer.error",
      integrationErrorMessage : "$context.integrationErrorMessage"
    })
  }
}
access_log_settings でアクセスをログに記録するための設定を行なっています。format でアクセスログ 1 行の形式を指定、$context 変数で値を指定します。
docs.aws.amazon.com
APIGateway に Lambda へのアクセスを許可
APIGateway 側の一通りの設定が済んだので、最後に APIGateway から Lambda へのアクセスを許可します。
main.tf
# APIGateway に Lambda へのアクセスを許可
## https://registry.terraform.io/providers/hashicorp/aws/latest/docs/resources/lambda_permission
resource "aws_lambda_permission" "execution_log_access_api_gateway" {
  statement_id  = "test-AllowExecutionFromAPIGateway"
  action        = "lambda:InvokeFunction"
  function_name = aws_lambda_function.log_events.function_name
  principal     = "apigateway.amazonaws.com"

  source_arn = "${aws_apigatewayv2_api.log_events.execution_arn}/*/*"
}
動作確認
ここまでで一連の構成は定義できたので、apply して環境を構築し、エンドポイントへリクエストを送信すれば API Gateway, Lambda, DynamoDB が連携して動作し、データが保存されます。
API Gateway で作成されたエンドポイントの URL ですが、でデフォルトでは
https://<api_id>.execute-api.<region>.amazonaws.com/xxxxxxx...
という形式になっています。
カスタムドメインを設定すると、自分のドメインを使ってエンドポイントの URL を作成できるので、こちらの設定を行なってみます。
(ネイキッドドメインは Route53 に登録済みの前提です。
まずは、利用するサブドメインの証明書を ACM で作成しておきます。
main.tf
# 作成済みホストゾーン情報の取得
## https://registry.terraform.io/providers/hashicorp/aws/latest/docs/data-sources/route53_zone
data "aws_route53_zone" "myDomain" {
  name = var.domain_name
}

# ACM 証明書作成
## https://registry.terraform.io/providers/hashicorp/aws/latest/docs/resources/acm_certificate
resource "aws_acm_certificate" "APIGatewayHttpApi" {
  domain_name       = "samle-htttp-api.ritolab.com"
  validation_method = "DNS"
}

## ACM 検証用 CNAME レコード
### https://registry.terraform.io/providers/hashicorp/aws/latest/docs/resources/route53_record
resource "aws_route53_record" "api_gateway_http_api_acm_c" {
  for_each = {
  for d in aws_acm_certificate.APIGatewayHttpApi.domain_validation_options : d.domain_name => {
    name   = d.resource_record_name
    record = d.resource_record_value
    type   = d.resource_record_type
  }
  }
  zone_id         = data.aws_route53_zone.myDomain.zone_id
  name            = each.value.name
  type            = each.value.type
  records         = [each.value.record]
  ttl             = 60
  allow_overwrite = true
}

## ACM 証明書 / CNAME レコード 連携
### https://registry.terraform.io/providers/hashicorp/aws/latest/docs/resources/acm_certificate_validation
resource "aws_acm_certificate_validation" "APIGatewayHttpApi" {
  certificate_arn         = aws_acm_certificate.APIGatewayHttpApi.arn
  validation_record_fqdns = [for record in aws_route53_record.api_gateway_http_api_acm_c : record.fqdn]

  depends_on = [
    aws_acm_certificate.APIGatewayHttpApi,
    aws_route53_record.api_gateway_http_api_acm_c
  ]
}
カスタムドメインを設定します。
main.tf
## カスタムドメイン登録
## https://registry.terraform.io/providers/hashicorp/aws/latest/docs/resources/apigatewayv2_domain_name
resource "aws_apigatewayv2_domain_name" "http_api" {
  domain_name = "sub.domain.com"

  domain_name_configuration {
    certificate_arn = aws_acm_certificate.APIGatewayHttpApi.arn
    endpoint_type   = "REGIONAL"
    security_policy = "TLS_1_2"
  }

  // 証明書作成が完了してから
  depends_on = [
    aws_acm_certificate_validation.APIGatewayHttpApi,
  ]
}

## API マッピング
## https://registry.terraform.io/providers/hashicorp/aws/latest/docs/resources/apigatewayv2_api_mapping
resource "aws_apigatewayv2_api_mapping" "http_api" {
  api_id      = aws_apigatewayv2_api.log_events.id
  domain_name = aws_apigatewayv2_domain_name.http_api.id
  stage       = aws_apigatewayv2_stage.log_events.id
}

# route53 A レコード作成
## https://registry.terraform.io/providers/hashicorp/aws/latest/docs/resources/route53_record
resource "aws_route53_record" "http_api" {
  name    = aws_apigatewayv2_domain_name.http_api.domain_name
  type    = "A"
  zone_id = data.aws_route53_zone.myDomain.zone_id

  alias {
    name                   = aws_apigatewayv2_domain_name.http_api.domain_name_configuration[0].target_domain_name
    zone_id                = aws_apigatewayv2_domain_name.http_api.domain_name_configuration[0].hosted_zone_id
    evaluate_target_health = false
  }
}
カスタムドメインを登録し、API マッピングを行なった後に、route53 へ使用するサブドメインの A レコードを作成しています。
ポイントとしては、カスタムドメイン登録のときに depends_on を指定し、証明書の作成を待ってからカスタムドメインの登録を行うようにします。 依存関係を指定しておかないと証明書が有効になる前にカスタムドメインを登録しようとしてエラーになります。
これでカスタムドメインでエンドポイントへアクセスできるようになります。
% curl https://sample-http-api.ritolab.com/events
{"Items":[{"date":"2021-08-28","eventType":"test","time":"14:19:00.000","userId":"EX8C9MRZfhL"},{"date":...
IAM 認証
現状ではエンドポイントは開放されている状態なので、IAM 認証をかけてアクセス制限を掛けます。(既に Cognito とか Auth0 とかで認証のあるサービスなら IAM 認証ではなく Lambda オーソライザー使うのが良さそう)
API Gateway のルートの設定において、認証を IAM に変更します。
main.tf
resource "aws_apigatewayv2_route" "log_events" {
  .
  .
  .
  authorization_type = "AWS_IAM"
}
これだけです。あとはリクエスタとしての IAM ユーザーを作成して、適宜必要な権限を設定してあげます。
main.tf
# IAM Role for ApiGateway
resource "aws_iam_policy" "api_gateway_log_event_requester" {
  name        = "xxxxxxxxx"

  policy = jsonencode({
    Version : "2012-10-17",
    Statement = [
      {
        Effect: "Allow",
        Action: [
          "execute-api:Invoke"
        ],
        Resource: [
          "arn:aws:execute-api:${var.aws_region}:${var.aws_id}:${aws_apigatewayv2_api.log_events.id}/*/GET/events",
          "arn:aws:execute-api:${var.aws_region}:${var.aws_id}:${aws_apigatewayv2_api.log_events.id}/*/POST/events",
        ],
      },
    ]
  })
}

# IAM User for ApiGateway execution
## https://registry.terraform.io/providers/hashicorp/aws/latest/docs/resources/iam_user
resource "aws_iam_user" "api_gateway_log_event_requester" {
  name = "api-gateway-log-event-requester"
}

## https://registry.terraform.io/providers/hashicorp/aws/latest/docs/resources/iam_user_policy_attachment
resource "aws_iam_user_policy_attachment" "api_gateway_log_event_requester" {
  user       = aws_iam_user.api_gateway_log_event_requester.name
  policy_arn = aws_iam_policy.api_gateway_log_event_requester.arn
}
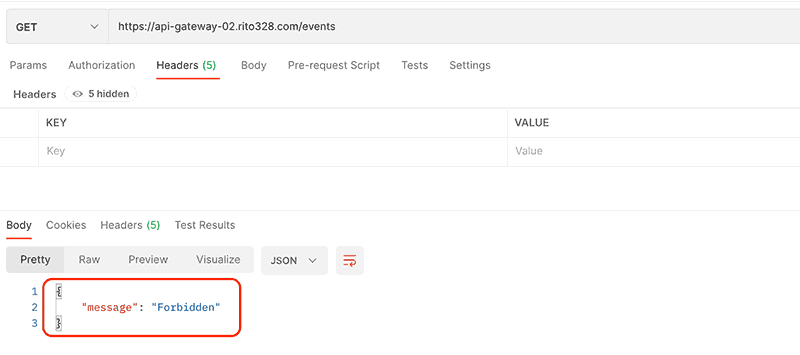
これで、アクセスが許可されたユーザー以外からのリクエストは遮断されます。
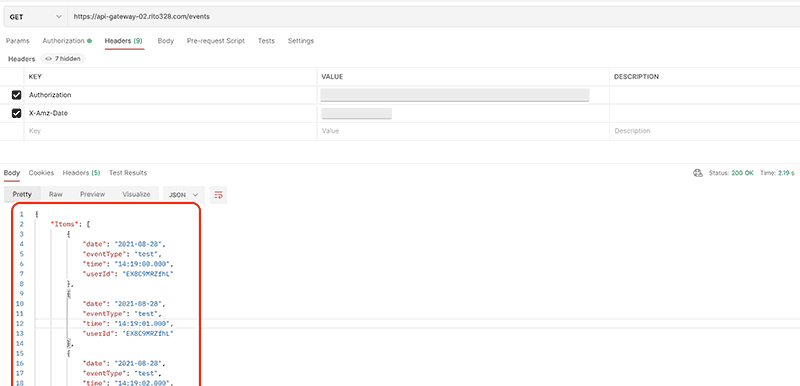
一方で、許可された IAM ユーザーからのリクエストは受け入れられデータが取得できている事を確認できました。
まとめ
エンドポイントからバックエンド、DB まで一連をサーバレスアーキテクチャで構築しました。
レスポンスは遅くないので、これでサーバ運用の手間が減ると考えるとサーバレス化は手段としてはアリだなと感じました。
あとやはり個々のサービスが疎結合になるため、必要に応じて最適なプログラミング言語を選択できるのも場合によっては利点になり得る要素だと思いました。
それと、API Gateway でのエンドポイントを今回は HTTP API で構築してみましたが、オートデプロイが行えるのは現時点では HTTP API のみで REST API には無い機能だったので、開発時にデプロイを気にしなくて良いのはとても便利でした。
AWS Well-Architected フレームワークの「パフォーマンス効率の柱 設計の原則」においてサーバレスアーキテクチャが推奨されているように、サーバレス構成は適所で採用すればとても使えるアーキテクチャでした。
docs.aws.amazon.com